


How to Fix Rounded Shoulders: A Practical Guide
Check your relaxed thumbs. If they turn in towards each other, your shoulders may be sitting too far forward. We’ll show you how to fix rounded shoulders with chest stretches, upper-back mobility, shoulder-blade strength and small daily changes. Most moves need little equipment, and many use short holds.
Table of Contents
Step 1: Check Your Shoulder Position and Possible Contributing Factors
Before you work out how to fix rounded shoulders, check what your body is doing at rest. Stand tall without forcing your chest up. Let your arms hang loose, then point your thumbs out.
If your thumbs point towards each other, your shoulders may be resting in internal rotation. This is one useful screen, not a diagnosis. You can also take a relaxed side photo. Look for a forward head, a rounded upper back or shoulders that sit in front of your hips.
Think about your daily pattern. Long hours at a laptop, reading in bed, phone use and a chair that slopes back can all keep you in forward flexion. Your body may simply be adapting to the positions you repeat most often.
Rounded shoulders can also link with changes lower down. A pelvis that shifts forward or back may change how your rib cage and upper back sit. That means forcing your shoulders back all day may feel stiff and hard to maintain.
We take the time at Unleashed Health Chiropractic to assess how your neck, upper back, shoulders and daily habits work together. If pain, weakness, pins and needles or a recent injury is involved, get individual advice before starting a new exercise plan.
For a useful explanation of postural alignment and common self-checks, see our posture correction exercises guide . Your first goal is a calm, comfortable position, not a rigid military stance.
Key Takeaway:Use the thumb check as a starting point, then look at your whole movement pattern rather than blaming one tight muscle.
Step 2: Stretch Tight Chest and Front-of-Shoulder Muscles
Chest tightness can pull your shoulders forward, especially after long periods with your arms in front of you. Stretch gently. The aim is to give your shoulders room to move, not to force them into a new position.
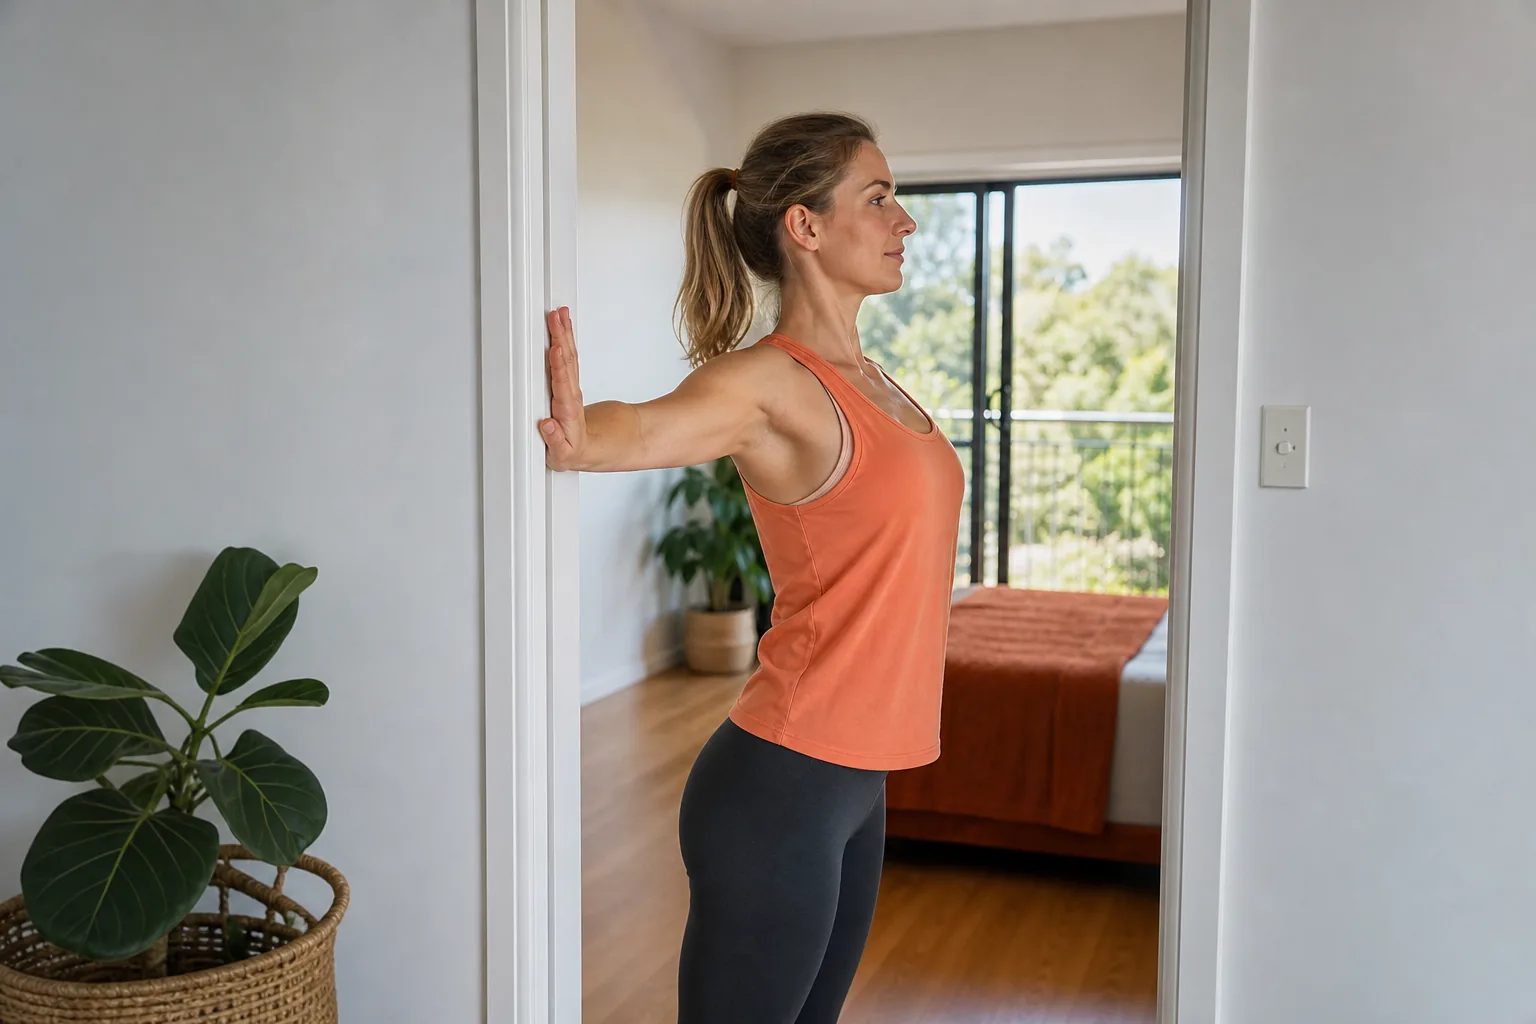
Try a doorframe chest stretch
Stand in a doorway with one forearm resting on the frame. Keep your elbow around shoulder height. Step through slowly until you feel a mild stretch across the chest and the front of the shoulder. Keep your ribs relaxed instead of flaring them up.
Hold for 20 to 30 seconds, then change sides. You can move your arm slightly higher or lower to find a different part of the chest. Stop if you feel sharp pain, tingling or a pinch deep inside the shoulder.
Stretch the front of the shoulder with control
For a deeper variation, place your hand and forearm on the doorway. Turn your chest away while keeping the shoulder blade gently back. This can target the muscles that rotate the arm inwards, including the subscapularis, which is one of the rotator cuff muscles.
Many online exercise lists name the stretch but skip the muscle target. In the checklist reviewed for this topic, only 3 of 16 items named the muscles they worked. That detail matters because it helps you notice whether you feel a useful stretch or simply strain a joint.
We can tailor this part of your plan at Unleashed Health Chiropractic if one side feels much tighter or your shoulder has a past injury. A stretch should leave you feeling looser, not sore for the rest of the day.
Step 3: Improve Thoracic Spine Mobility
Better shoulder posture often starts at the thoracic spine, which is the middle section of your back. If this area stays rounded and stiff, your shoulders may keep sliding forward even after you stretch your chest.
Use floor rotation and extension
Lie on your stomach with your arms reaching overhead in a relaxed Y shape. Keep your hips as still as you can. Slowly roll towards one side while letting your upper back rotate and extend. Return to the start, then repeat on the other side.
Move through a comfortable range. You don’t need to lift high or push into pain. Try three or four slow repetitions per side. If lying on your stomach is uncomfortable, use a seated rotation instead. Sit upright, cross your arms over your chest and turn your upper body without twisting from the hips.
Try a foam roller or towel
If you have a foam roller, place it across your upper back. Support your head with your hands and gently extend over the roller. Keep the movement in the upper back. Don’t crank your neck or let your lower ribs flare.
A rolled towel can provide a softer option. Place it across the upper back while lying down, then rest for a few breaths. This is a mobility drill, not a test of flexibility. A small movement done often is usually easier to repeat than a hard stretch done once.
Thoracic mobility was one of the clearest themes in the exercise material reviewed. It also included rotation and extension work because the upper back affects how the shoulder blades sit on the rib cage.
Our team at Unleashed Health Chiropractic can help you work out whether stiffness comes from the upper back, shoulder joint or another area. That matters when a home routine feels stuck.
Step 4: Strengthen the Muscles That Support Your Shoulder Blades
Stretching alone won’t teach your shoulders to stay in a better position. You also need to build control in the muscles that guide the shoulder blades, such as the middle and lower trapezius, rhomboids, serratus anterior and external rotators.
Start with a scapular retraction hold
Sit or stand tall. Draw your shoulder blades gently back and slightly down, as if they are sliding into your back pockets. Don’t pinch hard. Hold for 20 to 30 seconds while breathing normally.
Keep your neck relaxed. If your shoulders rise towards your ears, reduce the effort. The goal is control, not a big squeeze.
Add a seated chair row
Sit facing the back of a sturdy chair. Hold the sides or back with your arms in front. Pull your elbows back while keeping your chest quiet. Pause when your shoulder blades move together, then return slowly.
This targets the middle and lower trapezius, rhomboids and other muscles that help guide the shoulder blades. Use a light effort at first. Your shoulder blades should move smoothly rather than jerk.
Progress to TheraBand™ lateral rotation or Y-T movements
For TheraBand™ lateral rotation, use a TheraBand™ about 12 inches long. Hold for 20 to 30 seconds and repeat two or three times.
You can also practise slow Y and T arm shapes while lying face down or standing against a wall. Stop before your lower back takes over. The shoulder-blade muscles involved in these movements give you a better cue than simply “pull your shoulders back.”
Start with two or three strength sessions each week. Keep the effort easy enough to maintain good form. If you have shoulder pain, we’ll adjust the range and load rather than asking you to push through it.
Step 5: Use Posture Cues, Desk Adjustments and Regular Movement Breaks
Rounded shoulders often return because the day keeps placing you in the same position. The answer is not to hold a stiff posture for eight hours. Change the setup and move before your body settles into a slump.
Set up your screen and keyboard
Place your screen high enough to keep your head closer to neutral. Keep the keyboard close so your elbows can stay near your sides. Adjust the desk or chair height until you can work without reaching forward.
Screen height and keyboard elbow angle support head, neck and shoulder alignment. Desk-height changes are another simple adjustment. You don’t need a costly office makeover. Start with the part of your setup that makes you reach or look down most.
Use one simple posture cue
Try the clavicle cue. Imagine your collarbones spreading gently wide. Let your breastbone float up a little while your ribs stay relaxed. This is softer than pulling your shoulders back with force.
Set a phone alarm as a reminder to check your position. When it sounds, take one breath, relax your jaw and let your arms hang. You can also use the forward head posture advice from Unleashed Health Chiropractic if your head moves forward with your shoulder slump.
Break up long sitting periods
Stand for a short break each hour. Choose a pattern you can keep. Walk to get water, stretch beside your desk or stand while reading a short message.
Alternating sitting and standing every 20 to 60 minutes can help you avoid one fixed position. A posture corrector may gently pull your shoulders back, but it shouldn’t do all the work. Treat it as a cue rather than relying on it all day.
Pro Tip:Put your reminder beside the task that causes the slump. A prompt that appears during long laptop work is more useful than one that arrives when you’re already away from your desk.
Step 6: Support Neutral Shoulder Position During Sleep and Build a Five-Minute Routine
Sleep won’t fix rounded shoulders by itself, but a poor position can leave your neck and shoulders stiff each morning. Aim to support a neutral line through your head, neck and upper back.
Make side sleeping more comfortable
If you sleep on your side, use a pillow that fills the space between your head and the mattress. Let the lower shoulder rest without being crushed underneath you. Hugging a pillow can stop the top shoulder from falling forward across your chest.
Keep the top arm supported rather than hanging in front of you. A pillow between your knees may also help you settle without twisting your trunk. Adjust the height until your neck feels level, not bent towards the mattress.
Try back sleeping if it suits you
Back sleeping can make it easier to keep both shoulders in a neutral position. Place a small pillow under your knees if that helps you relax. Your head pillow should support your neck without pushing your chin towards your chest.
Don’t force a sleep position that keeps you awake. Comfort comes first. If you wake with numbness, strong pain or repeated shoulder symptoms, seek an assessment rather than buying more pillows.
Build a five-minute daily routine
Keep the routine short enough to repeat:
One minute of slow thoracic rotations or gentle extension.
One minute of doorway chest stretching, changing sides halfway.
One minute of scapular retraction holds with relaxed breathing.
One minute of slow Y or T movements.
One minute of standing tall with the clavicle cue and easy shoulder movement.
This plan uses short holds and little equipment. In the checklist reviewed for this topic, timing appeared for 7 of 16 items, and the median hold was 20 seconds. That supports a simple approach, but it doesn’t tell you how hard each move should feel. Keep the effort mild and increase it only when control is easy.
Unleashed Health Chiropractic can assess your movement if pain or stiffness keeps blocking progress. We’ll tailor advice to your work setup, sleep position and activity level, rather than treating every rounded shoulder in the same way.

Frequently Asked Questions
Can rounded shoulders be corrected?
Rounded shoulders can often improve with regular mobility work, shoulder-blade strengthening and changes to daily habits. The right plan depends on what is driving your position, such as upper-back stiffness, chest tightness, weakness or pain. If symptoms persist, Unleashed Health Chiropractic can assess the pattern and guide safe next steps.
How long does it take to fix rounded shoulders?
There is no single time frame for improving rounded shoulders. Your result depends on how long the pattern has been present, your strength and how often you practise. A five-minute routine done most days is more useful than a hard session once a fortnight. Track comfort and movement, not just how you look in a photo.
What is the best exercise for rounded shoulders?
No single exercise fixes rounded shoulders for everyone. A useful plan usually combines a chest stretch, thoracic mobility and controlled work for the shoulder-blade muscles. Start with the move you can perform without pain or neck tension. Then add band rotation or Y-T work when your control improves.
Should I sleep on my back to improve my posture?
You don’t have to sleep on your back to improve posture. Side sleeping can work well when your head is supported and the top shoulder is not pulled across your chest. Hugging a pillow may help. Choose the position that lets you sleep well and wake without new pain or numbness.
When should I see a chiropractor for rounded shoulders?
See a chiropractor when rounded shoulders come with ongoing pain, reduced movement, weakness, pins and needles or a recent injury. You should also seek help when home exercises keep making symptoms worse. At Unleashed Health Chiropractic, we can assess your neck, upper back and shoulder movement before suggesting an individual care plan.
Can desk work cause rounded shoulders?
Desk work can contribute to rounded shoulders when it keeps your head, arms and upper back in a forward position for long periods. Raise the screen, bring the keyboard closer and stand regularly. Short movement breaks help you change position before stiffness builds.
Conclusion
Start with one chest stretch, one upper-back mobility drill and one shoulder-blade strength move. Practise them gently for five minutes each day, then change the desk and sleep habits that keep pulling you forward. If pain or restricted movement is part of the problem, contact Unleashed Health Chiropractic in Ascot Vale for a tailored assessment. We look forward to helping.


Comments